Building a Rails API for React: Part I — Environment Setup
May 24, 2019 · 4 min read
Update — April 4, 2026: This post has been updated to improve clarity and structure. Key changes include enhanced explanations of API-only architectures, updated environment management instructions, and refined code formatting for better readability.
When I first started learning React, I was disappointed by the lack of clear tutorials on integrating Rails as a pure API. Most guides suggested using webpacker or react-rails to keep everything inside the Rails monolith.
While that approach is fast, it creates a monolithic app where the backend and frontend are tightly coupled. A true API-only approach is more flexible; once your JSON endpoints are ready, it doesn't matter if your frontend is React, Vue, or a mobile app.
In this series, I’ll show you how to build a Rails API from the ground up, including Redux, Redux Saga, unit testing, and linting.
Building the API
We’ll build a movie database API with related artists using Rails 5.2.3 and Ruby 2.6.3.
$ rails new movie-api -T -B --database=postgresql --api
Flag Breakdown:
-T: Skips Minitest so we can use RSpec.-B: Skips the initialbundle installso we can configure our environment first.--database=postgresql: Sets up Postgres as our database engine.--api: Generates a lightweight Rails configuration optimized for API-only applications.
1. Defining the Ruby Gemset
When managing multiple projects, you want to isolate your dependencies to avoid version conflicts. Using RVM (Ruby Version Manager), we can create a dedicated "gemset" for this project.
Run this in your project root:
$ echo "movie-api" > .ruby-gemset
To trigger RVM to load the new gemset, exit and re-enter the directory:
$ cd ..
$ cd movie-api

Now, your gems will be installed in a safe container specific to this project.
2. Managing Database Configuration
I prefer to ignore database.yml in version control because it often contains sensitive credentials. Instead, we create a template for other developers to follow.
Create the Template
$ touch config/database.yml.template
Add your standard configuration to config/database.yml.template, leaving sensitive fields blank or using environment variables.
Update .gitignore
Add this line to ensure your local credentials aren't leaked to GitHub:
# Ignore the local database.yml
/config/database.yml
3. Setting Up the Development Environment
Code Linting with Rubocop
Consistency is key in a codebase. We’ll use Rubocop to enforce a coding standard.
Add the gem to your Gemfile:
group :development do
  gem "rubocop", "~> 0.70.0", require: false
end
Create a .rubocop.yml file to define your rules (e.g., maximum line length or quote styles). You can check for offenses by running:
$ rubocop
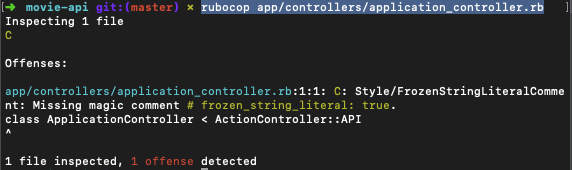
If Rubocop finds offenses (like those in the ApplicationController), you can often fix them automatically:
$ rubocop -a app/controllers/application_controller.rb
4. Testing Suite: RSpec, Shoulda Matchers, and FactoryBot
We’ll replace the default testing engine with RSpec, the industry standard for Rails testing.
Installation
Add these to your Gemfile:
group :development, :test do
  gem "rspec-rails", "~> 3.8"
  gem "factory_bot_rails"
end

group :test do
  gem "shoulda-matchers"
  gem "faker", git: "https://github.com/stympy/faker.git", branch: "master"
end
Run the generator to create your boilerplate:
$ bundle install
$ rails generate rspec:install
Configuration
Update spec/rails_helper.rb to integrate Shoulda Matchers (for easy association and validation tests) and FactoryBot (to generate dummy data without code duplication).
Example of a FactoryBot User:
FactoryBot.define do
  factory :user do
    email { "johndoe@email.com" }
    username { "johndoe" }

    trait :without_username do
      username { nil }
    end
  end
end
Next Steps
We've laid the foundation for a API. In the next post, we will create the Movie resource, implement serializers for clean JSON rendering, and add CORS support so our React frontend can talk to the backend.