Automating Rails API Documentation with Dox and RSpec
February 28, 2019 · 4 min read
Update — April 4, 2026: This post has been updated to improve clarity and structure. Key changes include refined configuration steps, improved code block formatting, and a more concise explanation of the documentation workflow.
Documenting an API is often one of the most tedious requirements in backend development. Whether it is for a college project or a production environment, keeping endpoints, request bodies, and responses up to date manually is a recipe for errors.
When I was recently tasked with documenting a Rails backend for an Android application, I went looking for a solution that didn't feel like "extra work." I wanted something that integrated into my existing workflow.
After researching several gems, I chose Dox. Unlike other tools that require you to clutter your controllers or create entirely separate test folders, Dox generates documentation based on your existing RSpec tests. While it requires some initial setup, it is incredibly powerful once integrated.
1. Project Setup
First, let's create a new Rails API project:
$ rails new book-app --api -T --database=postgresql
Adding Dependencies
We need to add rspec-rails and dox to our Gemfile:
group :development, :test do
  gem 'rspec-rails', '~> 3.8'
end

group :test do
  gem "dox", require: false
end
Run the following commands to install the gems and initialize RSpec:
$ bundle install
$ rails generate rspec:install
2. Configuring Dox
To integrate Dox with RSpec, we need to modify the rails_helper.rb file. This configuration tells RSpec to capture request and response metadata during test execution.
# spec/rails_helper.rb
require "dox"

# Require all documentation structure files
Dir[Rails.root.join("spec/docs/**/*.rb")].each { |f| require f }

RSpec.configure do |config|
  config.after(:each, :dox) do |example|
    example.metadata[:request] = request
    example.metadata[:response] = response
  end
end

Dox.configure do |config|
  config.header_file_path = Rails.root.join("spec/docs/descriptions/header.md")
  config.desc_folder_path = Rails.root.join("spec/docs/descriptions")
  config.headers_whitelist = ["Accept"]
end
3. Creating a Resource
Let's generate a basic scaffold so we have something to document:
$ rails g scaffold Book title plot:text
$ rails db:migrate
Static Descriptions
Dox uses Markdown files for static information. Create a folder structure under spec/docs/descriptions to store these:
# spec/docs/descriptions/books.md
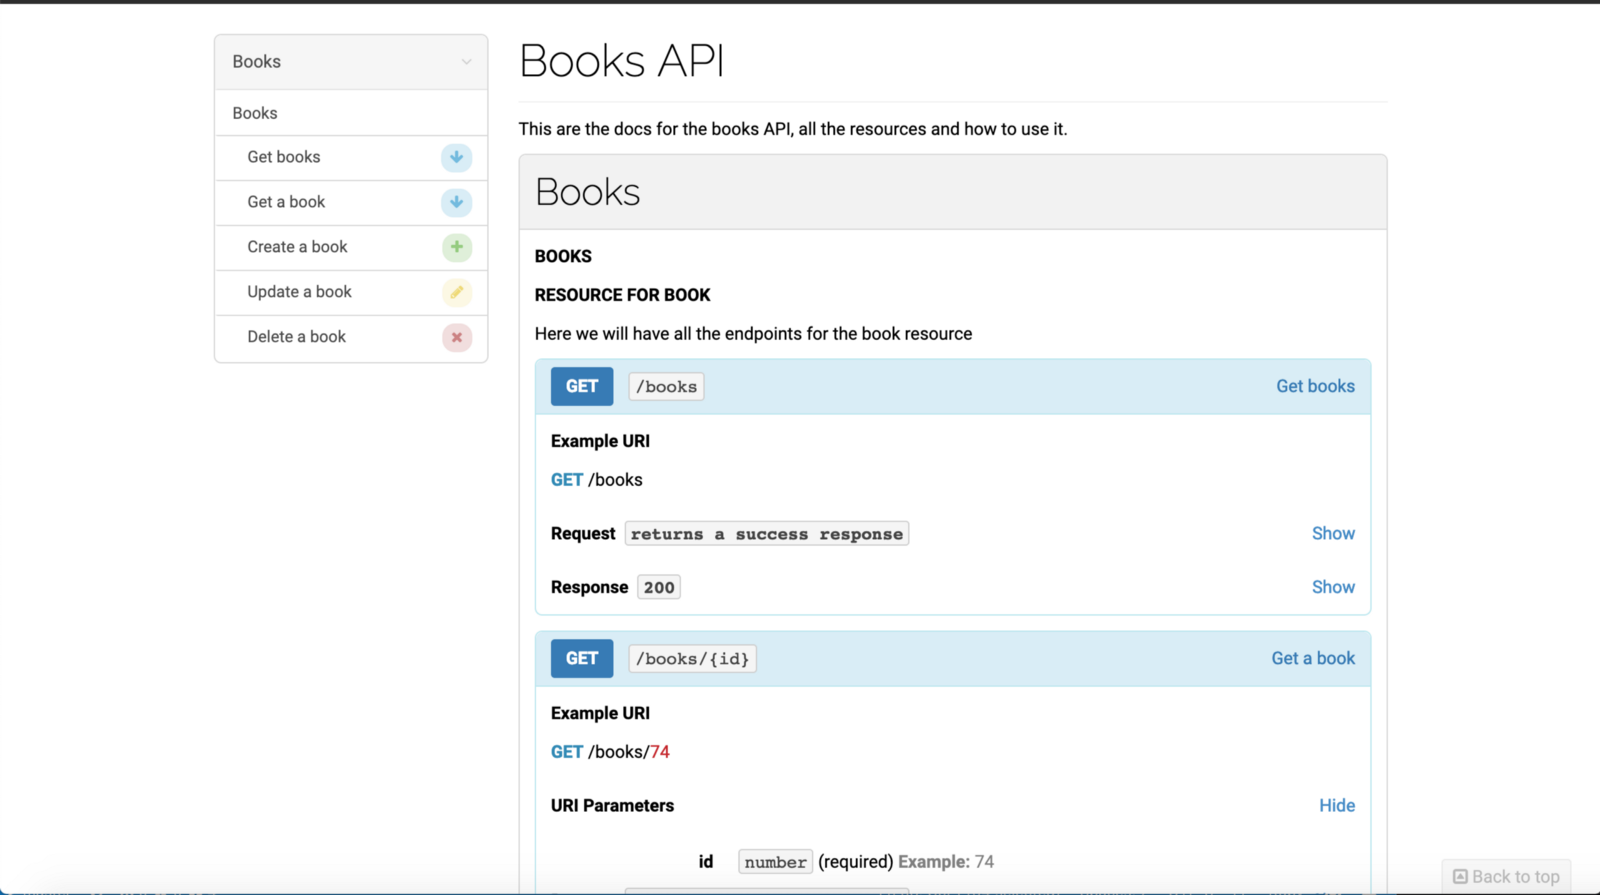
### Resource for Book
Here we will have all the endpoints for the book resource.
# spec/docs/descriptions/header.md
# Books API
This is the documentation for the Books API, covering all available resources and usage guides.
4. Defining the Documentation Structure
Using the Dox DSL, we define how our resources and actions should appear in the documentation.
# spec/docs/books.rb
module Docs
  module Books
    extend Dox::DSL::Syntax

    document :api do
      resource "Books" do
        endpoint "/books"
        group "Books"
        desc "books.md"
      end
    end

    document :index do
      action "Get books"
    end

    document :show do
      action "Get a book"
    end

    document :update do
      action "Update a book"
    end

    document :create do
      action "Create a book"
    end

    document :destroy do
      action "Delete a book"
    end
  end
end
5. Integrating with Controller Specs
Now, we link these definitions to our actual tests. By including the relevant Dox modules and tagging tests with :dox, the gem knows which data to capture.
# spec/controllers/books_controller_spec.rb
RSpec.describe BooksController, type: :controller do
  include Docs::Books::Api

  describe "GET #index" do
    include Docs::Books::Index

    it "returns a success response", :dox do
      Book.create!(title: "Sample Book", plot: "Sample Plot")
      get :index, params: {}
      expect(response).to be_successful
    end
  end
end
6. Generating and Rendering Documentation
To generate the Markdown documentation, run the following RSpec command:
$ bundle exec rspec spec --tag apidoc -f Dox::Formatter --order defined --out public/api/docs/v1/apispec.md
Converting Markdown to HTML
While the Markdown file is useful, it’s much better to have a searchable, interactive HTML page. Dox supports several renderers, including Aglio.
First, install Aglio globally using npm:
$ npm install -g aglio
Then, run the renderer:
$ aglio --include-path / -i public/api/docs/v1/apispec.md -o public/api/docs/v1/index.html
Once generated, your documentation will look like a professional, structured API guide:
Conclusion
By leveraging Dox, your unit tests serve a dual purpose: verifying your code and generating your documentation. It ensures that as your API evolves and your tests are updated, your documentation remains in sync without requiring a manual rewrite of Markdown files or Swagger JSONs.
For further exploration, you can check out the official Dox demo or my Book Example repository.